
Step 1: Sign in to Perplexity and find the subscription entry
Open perplexity.ai (external source, for verification only, not an endorsement) (the official Perplexity site; all external links here are provided for access only), click Sign in or Sign up free, and complete verification using your existing email or a third-party login method. Make sure the account email matches the account you intend to purchase with.
Open the Pro page and choose Get Pro, or go to the Subscription area in account settings and pick a plan from the upgrade entry.
Path: perplexity.ai → sign in → Pro page / Settings → Subscription → upgrade
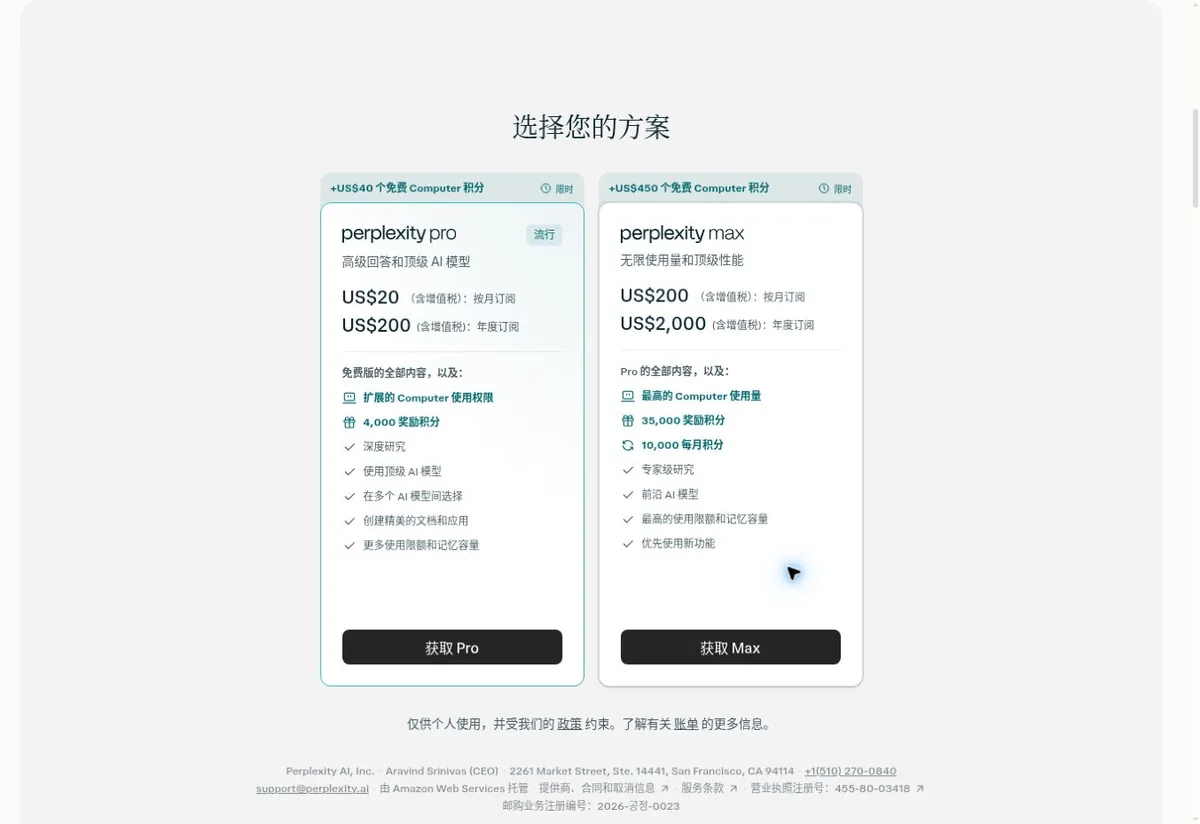 Illustration (not an official screenshot, no real information): the US-dollar prices and buttons in the image are shown only for recognition; actual purchases go by the checkout page on your account.
Step 2: Choose the plan and the billing cycle
This tutorial uses the Pro monthly plan as its example. The $200 per year is the cost for the whole year, not a monthly fee; Max is priced significantly higher, so confirm before paying that you haven't picked the wrong one.
| Plan | Standard monthly | Annual or promo notes | Use |
|---|---|---|---|
| Free | Free | N/A | Light basic searching |
| Pro | $20 | $200 per year | Personal research and higher usage |
| Max | $200 | $2,000 per year | Individuals needing higher usage limits |
US-dollar public standard or screenshot promo pricing; the actual tax, promo and final amount on your account go by the checkout page.
The chart is the US-dollar display of the official page (illustration, no real information); any tax-inclusive or bonus-credit information in the image belongs to that public page's state at the time. On the site, Pro and the API Platform are separate billing entries; buying Pro should not be taken as automatically getting unlimited API usage.
Step 3: Fill in the payment details against your PIKABAO card information
After choosing monthly or annual billing, enter the official payment page; verify the account, the Pro plan, the amount and the renewal date, then add or choose a bank card. The payment form fields correspond one-to-one with the PIKABAO card face:
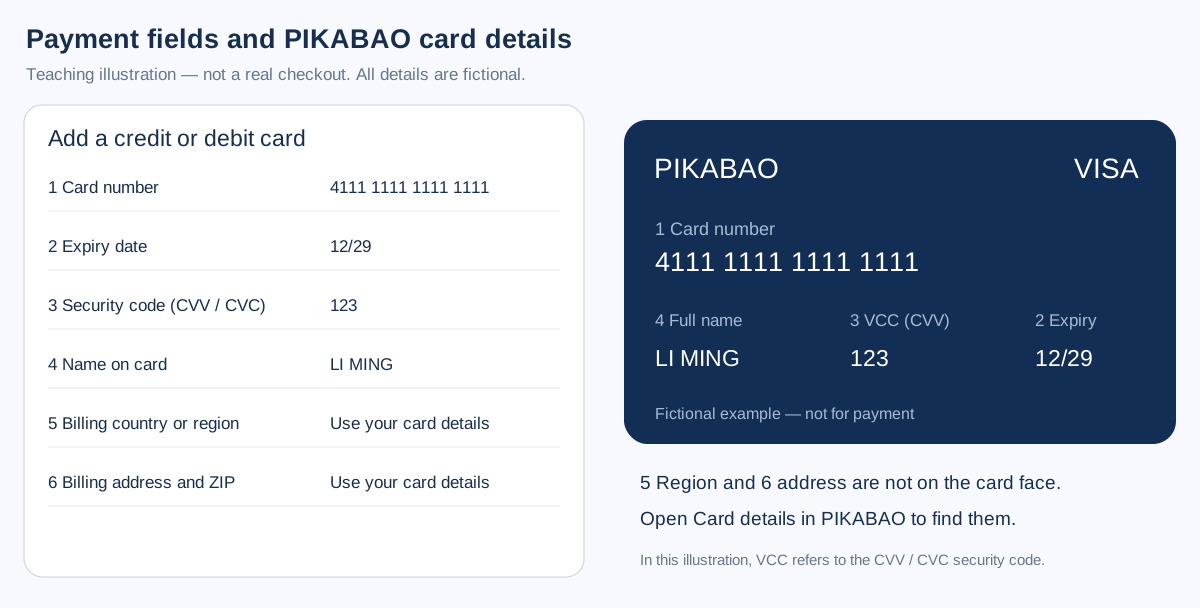 Illustration (not an official screenshot, no real information) — all data is fictional and must not be copied for payment. The VCC label on the card face stands for the security code in this set of tutorials; standard payment fields usually call it CVV / CVC.
Copy the real details from your PIKABAO console one by one and check the last four digits of the card number: card number → Card number; expiry → MM/YY; security code → CVV / CVC; full name → Name on card.
Region and address: open Card details in your PIKABAO console and fill in Billing country, Street address, City, State / Province and ZIP / Postal code as actually required; don't make up an address or copy the tutorial example. How to get them, see Where to find your card number, expiry and CVV and Where does the billing address come from; what can block you when the address doesn't match, see Will the AVS billing address check block a payment.
Choose a card that PIKABAO currently supports for this merchant and subscription renewals. Whether the payment passes still depends on the specific card, the bank and the merchant's review; no guarantee applies to all card families, and a card does not replace the service's account or regional eligibility.
Step 4: Pay and confirm the subscription succeeded
Before subscribing, confirm the tier shown at the top of the page is Pro and not Max, and that the cycle is monthly rather than the $200 annual charge. The three tiers differ by up to ten times.
If issuer verification appears, complete it using the method the card actually supports. Wait for a success status; don't keep resubmitting while the payment is processing — first check the account orders and card transactions.
Return to Subscription in account settings and confirm that Pro is active; refresh and check the paid features and usage.
Step 5: Confirm the membership and keep the payment records
Account settings → Subscription → Manage Plan / Manage Subscription to open billing management and view invoices and the payment method; also save the official confirmation email.
Find the spending records of this card in your PIKABAO console and verify the merchant, amount, currency and status. Temporary authorization, pending charges and the platform membership taking effect must be confirmed separately; don't take a card charge alone as proof that the membership succeeded.
Stop auto-renewal
Web subscriptions can be reached via Manage Subscription on the Pro page or in the Subscription area of the account; choose Cancel plan and complete the confirmation. Subscriptions bought through an app store are managed in the original store.
Deleting the PIKABAO card, running out of balance, uninstalling the app or signing out of the account does not replace formally cancelling the subscription on the platform. If purchased through an app store, manage the renewal in the original purchase channel.
Payment failed or membership not showing: four types of troubleshooting
Incorrect details: verify the real card number, expiry, security code, name and console billing address. Fill in only the fields as they actually are; don't enter a verification code into the CVV.
Card or balance issues: confirm the card status, that the available balance covers the actual order and applicable fees, and that the card currently supports this merchant. If the bank or the merchant declines a payment, stop retrying first and investigate the cause.
Charged but not activated: verify the signed-in account, the current workspace, the order status and whether final activation has completed. Provide the order number, time, amount and masked screenshots to the platform's official support; for card issues, contact PIKABAO support — never send the security code.
Renewal amount changed: check taxes, promo expiry, the annual cycle, added usage, seats or credit purchases. Refunds must be applied for per the merchant's policy; cancelling a subscription is not an automatic refund.
No card yet? Open one first: what to prepare to open a card
| Step | What to prepare | Fee and time |
|---|---|---|
| Registration | Email + password, activated by verification code | About 30 seconds, free |
| Identity verification | Submit genuine identity details under current first-issuance requirements; configure two-step verification separately | Subject to the actual review status and published terms |
| Two-step verification | Configure Google Authenticator as prompted to protect the account with time-based codes | Separate from identity verification; not a substitute for identity review |
| Account top-up | USDT, TRC20 / ERC20 networks only | $0 fee; minimum 20 USDT per deposit |
| Card opening | Choose a card range and initial limit (minimum limit 20) | Issuing fee from $1 + 3% service fee on the limit |
To open a card with a limit of 30, the account is actually charged $31.90 (= 30 of card limit + 30×3% service fee + $1 issuing fee); of this, only $1.90 is really taken as fees, and the remaining 30 is still your spendable limit. The full list of the four charges, see What does using a card cost in total; the fee rates are on Pricing.
Basis and maintenance
Figures 1 and 2 are both self-made operation illustrations (not official screenshots, no real information); no real card-binding interface from a personal account was obtained, no payment was actually made, and the illustrations are not labeled as official screenshots. Date verified 2026-10-12. Plans, prices, buttons and eligibility may be updated; go by the actual prompts on the official pages of your personal account.
Other subscription and deposit guides: ChatGPT Subscription Guide, Claude Subscription Guide, Facebook Ads tutorial, TikTok Ads tutorial, Google Ads tutorial, Binance P2P USDT purchases and PIKABAO deposits, OKX P2P USDT purchases and PIKABAO deposits, Coinbase USDT purchases and PIKABAO deposits, Runway subscription guide: payment and activation, Cursor subscription guide: payment and activation, Midjourney subscription guide: payment and activation, ElevenLabs subscription guide: payment and activation, Gemini subscription guide: Google AI Pro activation, GitHub Copilot subscription guide: payment and activation, Notion AI subscription guide: Business plan activation; the full answer index grouped by topic is in FAQ, and card selection and fees are on All card types overview.
Frequently asked questions
Is the Perplexity Pro annual plan of $200 billed at $200 per month?
No. The $200 annual plan is the cost for the whole year, roughly $16.7 per month; the Pro monthly plan is $20. The annual plan charges the full year's amount in one payment at checkout, so when reserving card limit, set aside the $200 plus taxes.
How do I choose between Perplexity Pro and Max?
Pro is $20 per month and covers personal research and higher usage; Max is $200 per month for users who need higher usage limits. The prices are 10x apart, so confirm before paying that you haven't picked the wrong tier.
Does buying Perplexity Pro mean unlimited API usage?
No. The website's Pro and the API Platform are separate billing entries, each metered and billed on its own; API usage is settled separately under the API Platform's rules.
Will Perplexity charge me automatically after the trial ends?
Yes. Promos or trials usually require a valid payment card to be bound, and when the trial ends the subscription renews automatically on the cycle you chose. Note the trial end date, and cancel before it expires if you don't plan to renew.
Does Perplexity ask for an address when binding a card? What if it's not on the card face?
Yes. The billing country or region and the address are not shown on the card face; open Card details in your PIKABAO console and fill them in field by field as the payment page asks — don't make up an address. A mismatched address may be blocked by the AVS check.
Perplexity charged me but Pro isn't active — what should I check first?
First verify the signed-in account and the order status, then go back to Subscription in settings to see whether the plan shows Pro and refresh the features. A temporary authorization on the card does not mean the subscription has taken effect — confirm the two separately.
Where do I cancel a Perplexity subscription?
On the web, go in via Manage Subscription on the Pro page or in the Subscription area of the account, choose Cancel plan and complete the confirmation; app-store purchases are managed in the original store. Deleting the card cannot replace cancelling.
Is it reliable to subscribe to Perplexity with a virtual card?
On a card range that supports this merchant it's a standard scenario: when the card range issuing country, the merchant category and the billing address are aligned, subscription payments generally go through smoothly. If the card limit on the renewal date is insufficient, the renewal fails — remember to leave the tax-inclusive amount.
The amount charged on renewal day was higher — is the platform overcharging?
First check taxes, the end of a trial or promo, the annual cycle and bonus-credit changes. The difference is not a fee collected by the platform; it's tax added to the bill by the merchant side, or the regular price restoring after a promo expires.
Open a card and get your Perplexity Pro subscription started
Opening a card costs from $1 with no monthly fee; top-ups accept USDT only. Pro monthly needs about $21.60 of card balance; the annual plan needs the full $200 plus tax.