
Step 1: Sign in to GitHub and find the subscription entry
Open github.com (external source, for verification only, not an endorsement) (GitHub's official site), click Sign in to log in to your personal GitHub account, and confirm your username. If your company has already assigned you a Copilot seat, first confirm the organization's authorization to avoid buying a personal plan in duplicate.
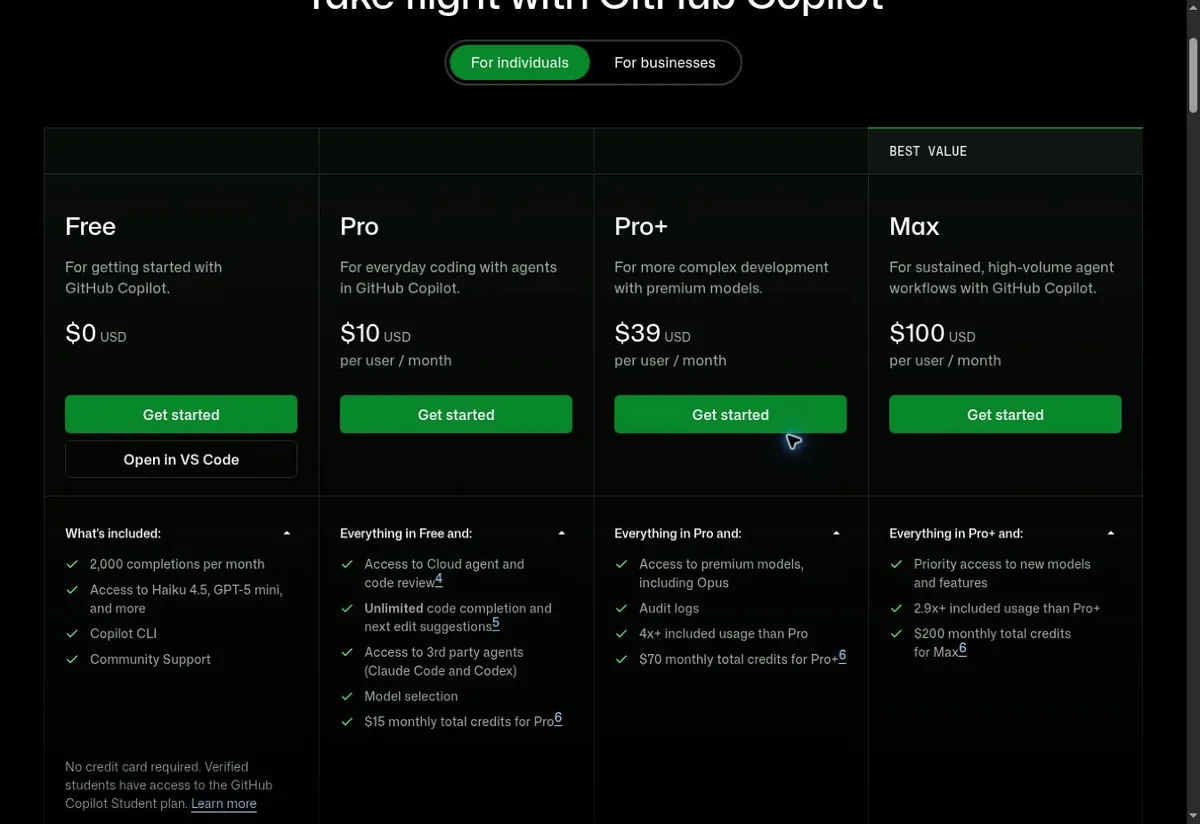
Go to the official Copilot Plans & Pricing page (github.com/features/copilot/plans (external source, for verification only, not an endorsement)), choose For individuals, and click Get started under the plan you need.
Path:github.com → Sign in → Copilot Plans & Pricing → For individuals.
Step 2: Choose a plan and billing cycle
What we're subscribing to here is GitHub Copilot. Other Pro or organization plans on a GitHub account are not the same as Copilot Pro. The official individual plans page currently shows Pro at $10, Pro+ at $39 and Max at $100 per user per month; whether annual billing is available, the discount and the total all follow the options your account offers at the time.
| Plan | Standard monthly | Annual or offers | Best for |
|---|---|---|---|
| Free | Free | Not applicable | Basic experience |
| Pro | $10 | As shown on your account | Personal everyday coding |
| Pro+ | $39 | As shown on your account | Higher limits and advanced models |
| Max | $100 | As shown on your account | Continuous high-usage workflows |
USD public standard or illustrative promo prices; taxes, offsets from existing plans and account offers are all settled on the final confirmation page.
During checkout you can choose whether to enable extra usage beyond the included allowance; if you don't want extra charges, don't enable it and check your budget settings.
Step 3: Fill in payment details by matching the PIKABAO card information
Click Subscribe to Copilot Pro / Pro+ / Max, choose the extra-usage settings as needed, click Save & continue, then fill in the billing and payment details and submit. The payment form fields map one-to-one to the PIKABAO card-face information:
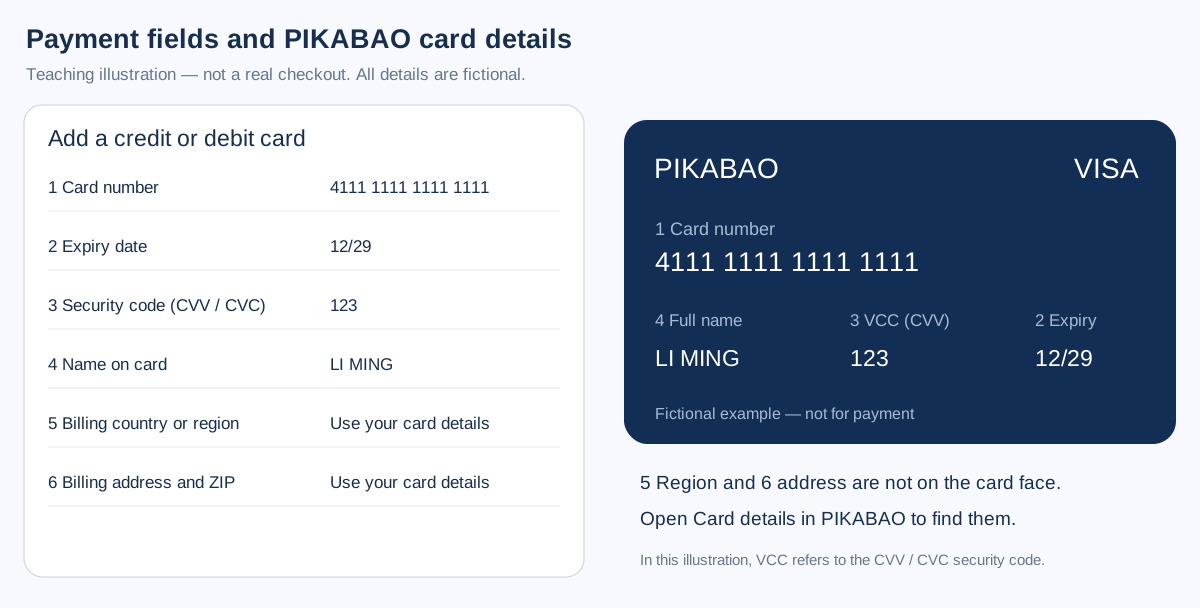
GitHub's payment form takes the card number, MM/YY, CVC and name on card in that order, with the billing address underneath. Take each value from PIKABAO → Card details and compare the last four digits before submitting; the GitHub invoice page only ever shows those four digits, so it cannot be used as the source. Where each field lives, see Where to find your card number, expiry and CVV.
Billing address: GitHub stores it against the payment method, so it has to match the card rather than your GitHub profile. Use the country, city, state and ZIP from PIKABAO → Card details; a state or ZIP that does not belong to the card's country is refused before the charge is attempted. See Where does the billing address come from and Will the AVS check block payment.
Copilot renews on the same card every cycle, so choose a card family that has already cleared a GitHub charge over one you have only used for shopping. If the first month passes and the renewal is refused, the account drops back to Free and the paid features stop mid-cycle.
Step 4: Pay and confirm the subscription succeeded
Before submitting, check the current account, plan, billing cycle, amount due, currency, billing email and the last four digits of the payment card. After confirming the auto-renewal terms, click the final payment button such as Subscribe / Pay / Upgrade.
GitHub sends some first payments through 3-D Secure. If your bank opens a verification page, finish it the way the card supports — an SMS code or an approval inside the bank app — and leave the tab alone until it returns to GitHub. Abandoning that page leaves the order pending rather than failed, and the amount stays held on the card.
After submitting your payment details, you still need to check the plan details and click Activate Copilot Pro / Pro+ / Max. If you only complete the temporary card verification, or don't click the final activation, the plan may still show Free — this is the step that's easiest to miss with this merchant.
Step 5: Confirm your membership and click the final activation
In your personal Settings → Billing & licensing, view the plan, payment history and receipts; check the current plan in the Copilot settings. Different versions may show Licensing or the older billing menus. The official getting-started instructions are in GitHub Docs · Get started with a Copilot plan (external source, for verification only, not an endorsement). If the plan still shows Free, go back to the plan details and click Activate Copilot Pro / Pro+ / Max to complete activation — finishing only the card verification without clicking Activate has no effect.
In PIKABAO, open the card and filter its records for a line from GITHUB. A pending line at the plan price is an authorization; the subscription is real when GitHub also shows the plan as active. GitHub charges at the start of each cycle, so the record usually appears on the same day the plan renews, not at the end of the month.
Stop automatic renewal
Go to Settings → Billing & licensing → Licensing, find Manage subscription under GitHub Copilot, choose Cancel subscription and complete the cancellation confirmation. The period end time shown is what counts; how to get there, see GitHub Docs · View and change your Copilot plan (external source, for verification only, not an endorsement).
Cancelling the PIKABAO card or letting the balance run to zero does not stop GitHub from billing: the plan stays active until GitHub itself is told to cancel, and a failed renewal leaves the account on Free with usage limits reset. Cancel in Settings → Billing & licensing first, then deal with the card.
Payment failed or membership not showing: four kinds of troubleshooting
Details rejected: GitHub has three card fields and a separate CVC box, and the CVC is the three digits on the card — never the six-digit code from an authenticator app. A single transposed digit produces a generic decline with no explanation, so compare against the backend field by field instead of retyping from memory.
Limit too low: Copilot is charged up front for the cycle you picked. Monthly billing needs one month of headroom; annual billing takes the whole year at once, which is where a card that worked last month comes up short. Compare the available limit with the invoice total, not with the monthly price.
Charged but still on Free: GitHub can take the money and leave the plan unassigned. Open Settings → Copilot and click Activate Copilot Pro / Pro+ / Max on the plan card. If no Activate button exists, check whether the purchase landed on a second GitHub account or was absorbed by an organization seat.
Renewal amount differs: switching Pro → Pro+ mid-cycle is prorated, adding a seat changes the total, and extra usage beyond the included allowance is invoiced separately. Read the line items under Billing & licensing before assuming the list price went up on its own.
Don't have a card yet? Open one first: what to prepare for card issuance
| Step | What to prepare | Fee and time |
|---|---|---|
| Registration | Email + password, activated via a verification code | About 30 seconds, free |
| Identity verification | Submit genuine identity details under current first-issuance requirements; configure two-step verification separately | Subject to the actual review status and published terms |
| Two-step verification | Configure Google Authenticator as prompted to protect the account with time-based codes | Separate from identity verification; not a substitute for identity review |
| Account top-up | USDT, TRC20 / ERC20 chains only | $0 fee; minimum 20 USDT per deposit |
| Card issuance | Choose a card family and the initial limit (minimum limit 20) | Issuing fee from $1 + 3% service fee on the limit |
Top-ups accept only USDT; Alipay, WeChat and bank cards aren't supported — there's no alternative channel for this step.
To open a card with a limit of 30, the account is actually charged $31.90 (= 30 of card limit + 30×3% service fee + $1 issuing fee), of which only $1.90 is a real fee — the other 30 stays as your spendable limit. The full list of the four charges, see What's the total cost of using a card; the on-site pricing entry is Pricing.
Editorial notes and maintenance
The images are self-made precise field illustrations; no real card-binding or checkout interface from a personal account was captured, and no payment was actually made, so the illustrations are never presented as official screenshots. Review date 2026-09-30. Plans, prices, buttons and eligibility may change; defer to the actual prompts on your own account's official pages.
The fee figures follow the site's current rates: account top-up fee $0, card top-up fee a flat 3%, issuing fee from $1, minimum 20 USDT per deposit, and a minimum total outlay of $21.6 to issue and top up (minimum card limit $20 + $1 issuing fee + $0.60 service fee). On the GitHub side, the plans, prices and billing help follow the official current statements; the entry is the official Copilot Plans page (external source, for verification only, not an endorsement).
Frequently asked questions
Are GitHub Copilot Pro and GitHub Pro the same thing?
No. GitHub Pro is an account-level plan, while Copilot Pro is an AI coding assistant plan; they're billed independently. the Copilot individual plans (Pro at $10, Pro+ at $39 and Max at $100 per user per month).
Why does Copilot still show Free after a successful payment?
Most likely the final activation wasn't clicked. After submitting your payment details, click Activate Copilot Pro / Pro+ / Max in the plan details; if you only finish the temporary card verification without clicking Activate, the plan stays on Free.
My company already assigned me a Copilot seat — do I still need to buy one myself?
First confirm that the organization's authorization covers the features and editors you use. Organization seats and individual plans are billed separately; after confirming, decide whether to buy an individual plan to avoid paying twice.
What is the $1 charge when binding a card for Copilot?
That's a temporary authorization hold for payment verification, not a subscription charge, and it gets released afterwards. It's a separate matter from the membership taking effect — check the activation status in the plan details, not the authorization record on the card.
Do I need to fill in an address when binding a card for Copilot? What if it's not on the card?
Yes. The billing country or region and the address aren't shown on the card face; open "Card details" in the PIKABAO backend to view them and fill them into the payment page fields separately; don't make up an address. A mismatched address can be blocked by the AVS check.
Does Copilot's extra usage get charged automatically?
During checkout you can choose whether to enable extra usage beyond the included allowance; if you don't enable it, no extra charge is produced. If it was enabled, it's settled separately according to your usage and budget settings.
Where do I cancel the Copilot subscription?
Settings → Billing & licensing → Licensing, find Manage subscription under GitHub Copilot, choose Cancel subscription and complete the confirmation; the benefits last until the period end time shown.
Is subscribing to Copilot with a virtual card reliable?
On a card family that supports this merchant, it's a standard scenario: when the BIN's issuing country, the merchant category and the billing address line up, subscription payments generally go through. If the card balance is insufficient on the renewal date, the renewal fails — remember to leave room for the tax-inclusive amount.
The charge was higher on the renewal day — is the platform overcharging?
First check taxes, the end of a promo, the annual billing cycle and extra-usage bills. The difference isn't a fee the platform collects; it's the tax the merchant adds to the bill or the regular price resuming after a promo ends.
Open a card and get your GitHub Copilot subscription started
Opening a card costs from $1 with no monthly fee; top-ups accept USDT only. Copilot Pro needs about $11.30 of card balance for a $10 month once the 3% funding fee is added.