
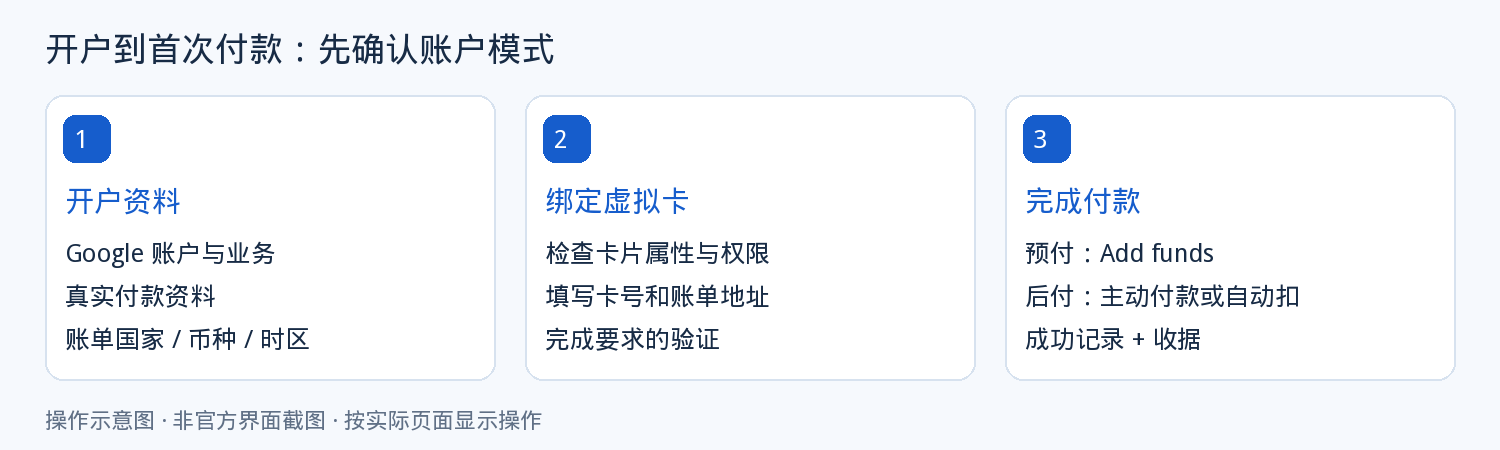
Account setup and payment are two separate stages in Google Ads. The account can be created quickly, but ads will not show until billing is set up; and whether a payment goes through depends on the card's attributes, the account's region, and the payment methods currently available.
Before you read on, keep one thing clear: a virtual card is a card format, while credit, debit, and prepaid are payment attributes. Not every virtual card works with Google Ads — automatic postpay does not accept prepaid cards, and some single-use virtual credit cards only offer a one-time payment path.
all screenshots are illustrative, not real account screenshots. Interfaces, regions, and account options may change; for payments, follow the checkout page and applicable terms on your own account.
Before you open the account: account and virtual card
| Preparation item | What to confirm |
|---|---|
| Google Account | The email used to manage ads; first check whether you already have an ads account to avoid creating a duplicate |
| Business and website | A real business name and an accessible website URL or applicable business page |
| Billing profile | The actual entity that will be billed, its address, and any applicable tax information |
| Virtual card | Card number, expiry date, CVC, name, and a real billing address |
| Card attributes | Confirm with the issuer: credit / debit / prepaid; whether it is a single-use card |
| Payment capability | Whether the card supports advertising merchants, online payments, subsequent automatic debits, and any required verification |
| Funds and limits | Balance or available limit that covers the payment, possible fees, and any authorization holds |
Your virtual card platform's account balance is not necessarily the available amount on the card.
After opening a card, topping up, or allocating a limit, check the available balance or budget of that specific card instead of just looking at the platform wallet balance. Topping up on the platform, adjusting card funds, and paying Google are three separate actions; only a successful payment to Google counts as the corresponding ad payment.
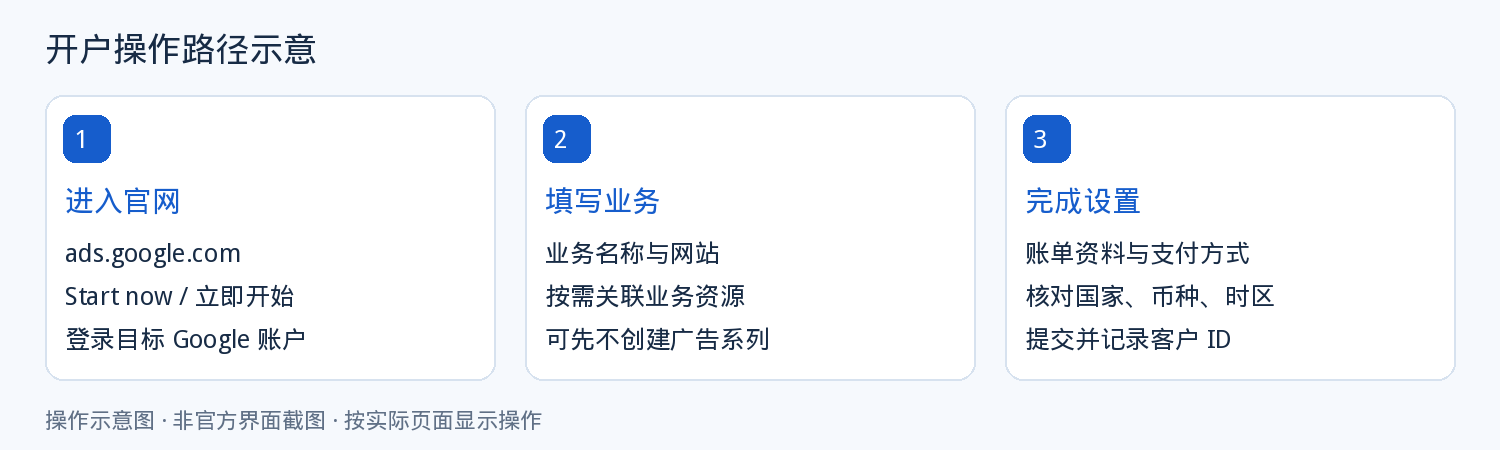
How to open a Google Ads account
- Sign in to the target email. Open ads.google.com in your browser, click "Get started", and sign in to the Google account you will use to manage ads. If you already have an ads account, switch to it first and check billing to avoid creating a duplicate by mistake.
- Fill in business details. Follow the prompts to enter your business name and website, and link YouTube or Google Business Profile as needed. The current official flow lets you create an account without creating a campaign right away — you can use the skip option on the page rather than relying on the fixed "Expert mode" button in older tutorials.
- Access account and billing settings. Fill in the billing country, time zone, currency, and billing profile. If the signup flow did not ask for a card, add one later under Billing; until billing is set up, ads cannot show.
- Confirm the result. After submitting, go into Google Ads and note your Customer ID (usually a 10-digit number). Make sure you are in the target ads account, not stuck at the manager level that controls multiple accounts — the cards and payment records you check later must all be reviewed in the correct account.
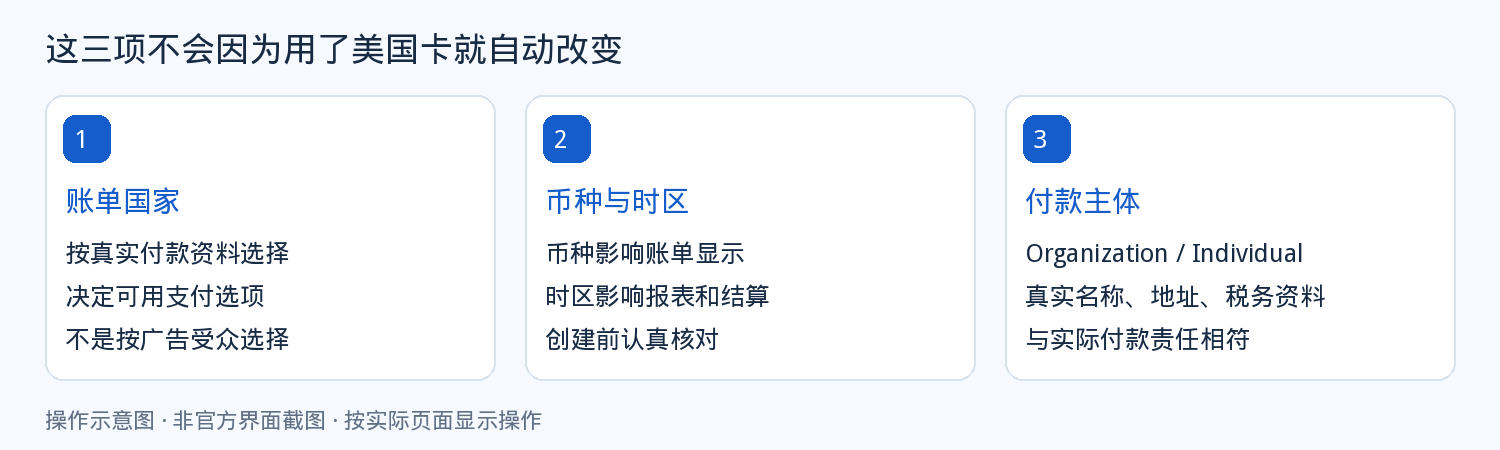
Billing country, currency, and billing profile
Choose the billing country based on the country or region of your actual billing address. Holding a US-issued virtual card does not mean the billed entity must be in the US, nor does it guarantee US payment options on the account; targeting your ads to the US does not mean the billing country is the US either.
How to fill in the billing profile: Organizations choose Organization; individuals choose the applicable Individual option. Enter the real legal name and address; if a tax ID applies, enter it as the official requirements state. Do not use the card platform's office address in place of your own business entity address. For the card's billing address field, follow the issuing records — the two addresses serve different purposes, so keep them straight.
Identify your payment model
Google Ads has two payment models: prepay and postpay. They decide whether you pay first or spend ad budget first, and whether you can add certain kinds of cards.
| Item | Prepay | Postpay |
|---|---|---|
| Common name in older tutorials | Manual payments | Automatic payments |
| Basic order | Add funds first, then spend on ads | Ad costs accrue first, then the primary card is charged |
| Manual payment entry | Billing → Summary → Add funds | Billing → Summary → Make an optional payment |
| What the balance means | Prepaid funds you can use; follow the label on the page | Unpaid charges or a prepaid credit balance; follow the label on the page |
| Automatic charges | Check per your actual settings; not available by default everywhere | Charged when the threshold is reached or on the 1st of each month |
| Virtual card requirements | Check based on how the region and page support it | Requires an applicable credit or debit card; prepaid cards are not accepted |
Older pages may use names like "Make a payment / Pay"; the menu translations and entry points change with the interface, so follow the current labels on your account.
How do you tell which one you have? Open Billing → Settings → "How you pay", and check whether it is Prepay or Postpay; then look at whether Summary shows Available funds / Add funds, or an unpaid balance with an automatic payment threshold. Enterprise monthly invoicing is a different payment term and is not the same as ordinary automatic postpay.
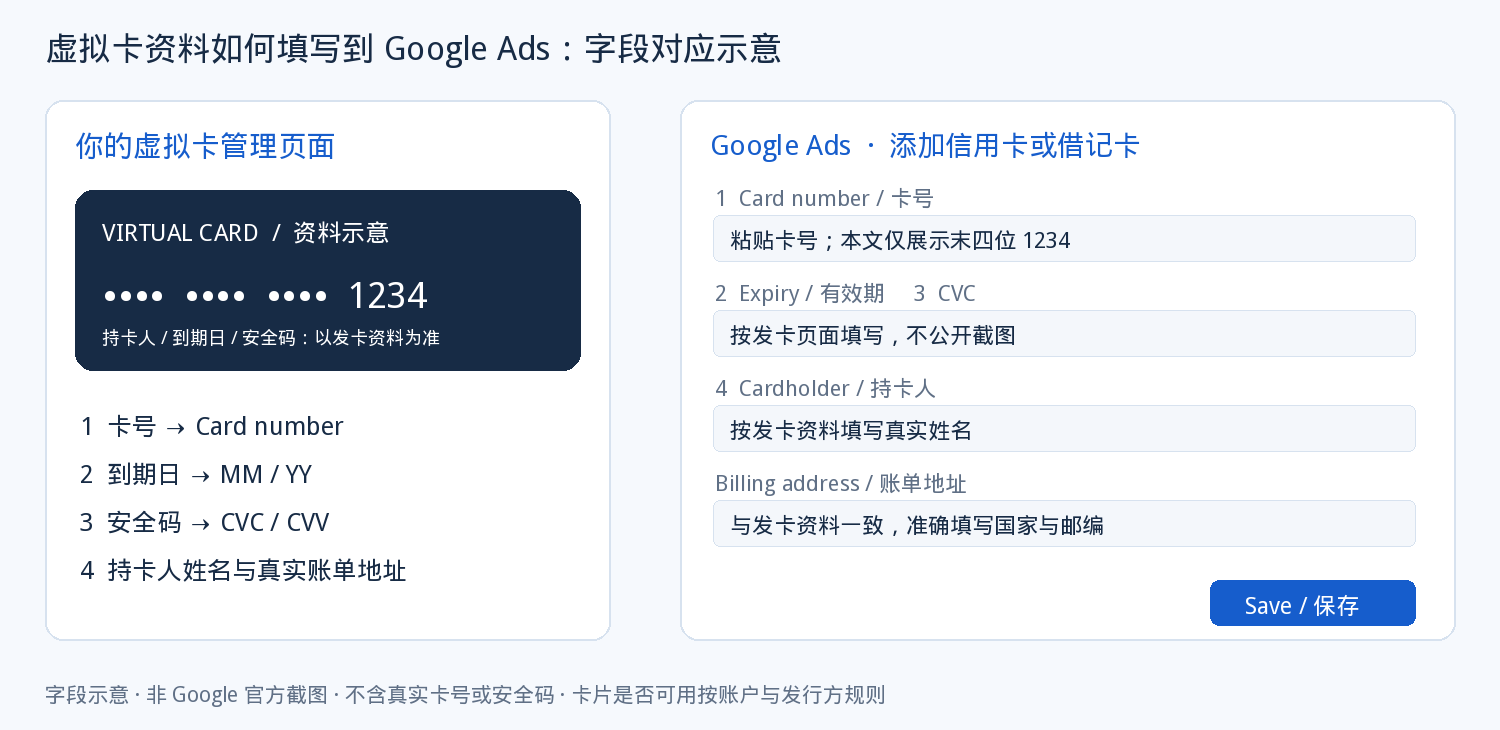
Adding your virtual card: how the fields map
- Card number maps to Card number; expiry is entered as MM / YY; the security code maps to CVC / CVV.
- Enter the name per the issuer's records — the display name the card platform provides is not necessarily the cardholder's name.
- The billing address must match the issuer's records; the country and postal code must be accurate.
The image above is an illustration made from the official card fields, not a real Google interface screenshot, and contains no usable card numbers.
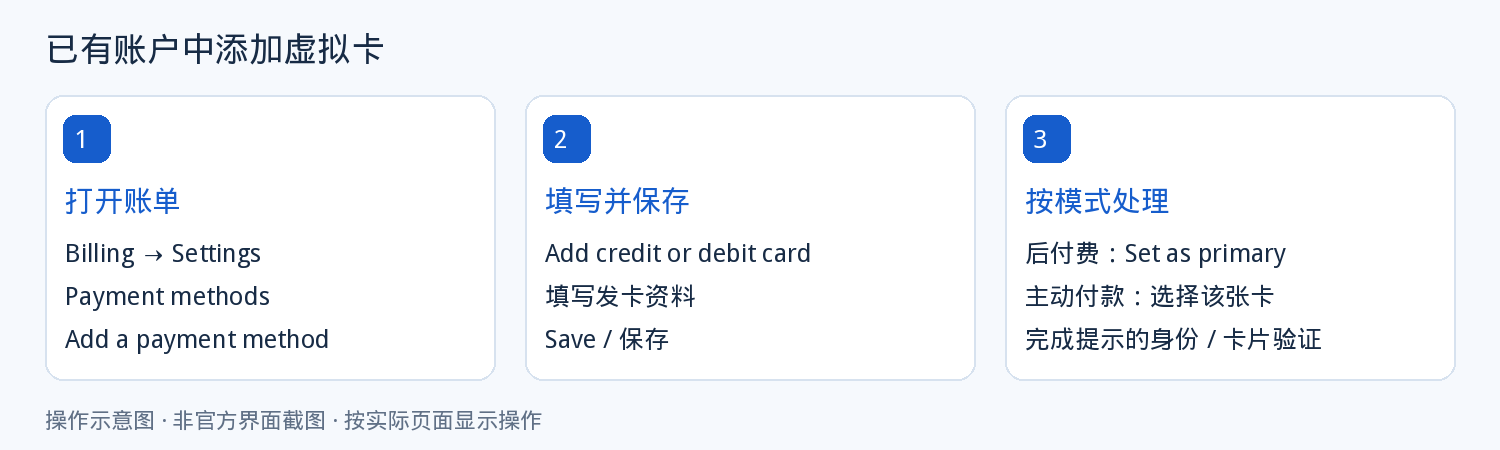
Saving the card, setting the primary card, and verification
- Open Billing → Settings and find Payment methods.
- Click "Add a payment method" and choose the credit or debit card option.
- Enter the virtual card details and address, agree to the terms, and click Save.
- If you will use this card for postpay long term, open the Actions menu on that card and choose "Set as primary payment method".
- After saving, confirm the primary card indicator and the last four digits; for a one-off manual payment, also select this card separately on the payment page.
When 3DS, a verification code, or payment method verification is required: complete the bank-required verification on the official page. If Google asks you to confirm a payment method, use the verification entry in your account notifications; the current Account verification page can be reached from Admin → Policy → Account. Some tasks ask you to "Get code" — read the 6-digit confirmation code from the card's transaction description and enter it.
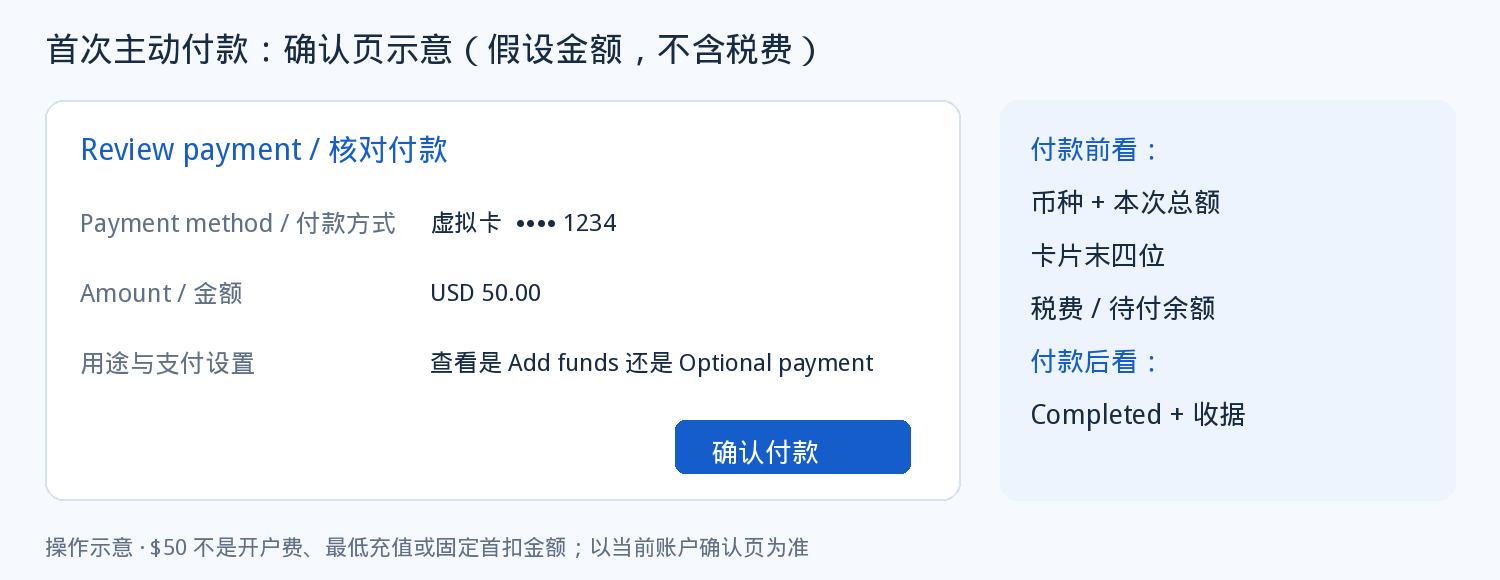
Prepay accounts: complete your first top-up
- Go to Billing → Summary and click Add funds in the Available funds area.
- Select the virtual card you just added; if it isn't saved yet, add a payment method as prompted on the page.
- Enter the amount you plan to pay. The minimum varies by region and currency — follow the page.
- On the payment confirmation page, review the currency, the card's last four digits, taxes, and the actual total.
- Confirm the payment and complete any bank verification the page requires.
- Wait for the status to change to success, check the available funds and the matching receipt, then start running ads.
Illustration: suppose the first payment is $50. Assume no tax, no previous balance, and the page allows paying $50: prepare enough available amount on the card → pay $50 to Google → available funds in Google Ads increase by about $50 → later spend $8, leaving about $42 in ad funds. Note: the top-up record in your card platform account is not the receipt for this Google payment.
$50 is just an illustration, not an opening fee, a fixed minimum top-up, or a guarantee of success. Taxes, previous balances, and billing adjustments all change the actual available funds; while a payment is processing, check its status first and don't place duplicate orders.
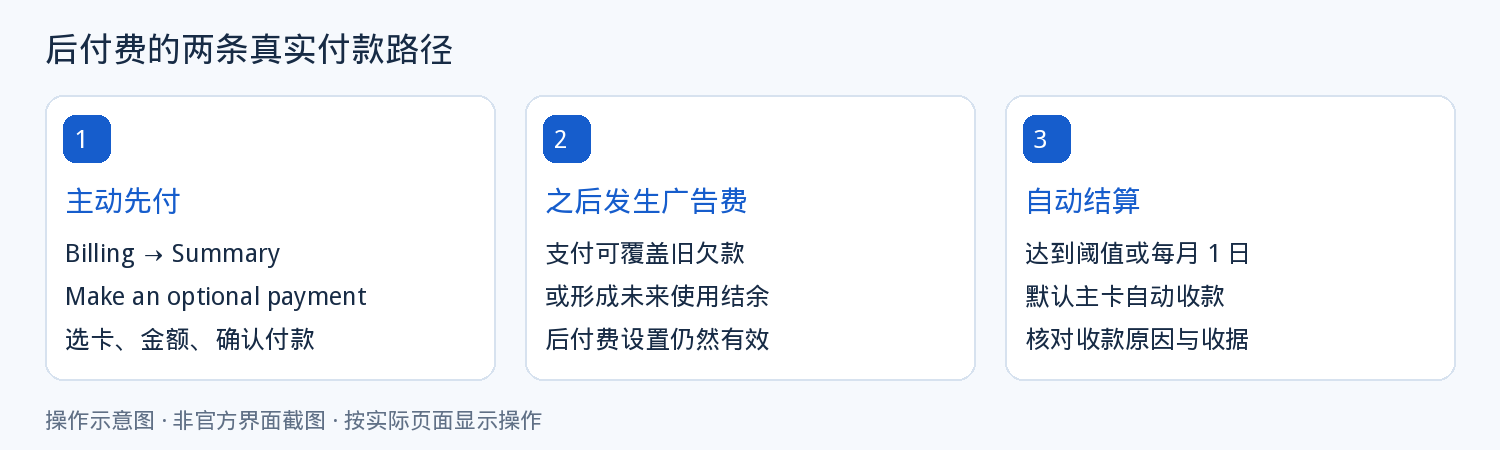
Postpay accounts: your first manual payment and automatic charges
If you want to make a formal payment right after opening the account: if the account shows "Make an optional payment", open that entry, choose the virtual card, enter an allowed amount, review the total, and confirm. This payment can settle existing charges, or overpay toward future ad costs; in the example with no previous balance, paying $50 manually creates a credit you can use later. This does not automatically change the account to prepay.
If you will wait for the first automatic charge: after adding an eligible card and setting it as primary, running ads accumulates costs. Suppose the account threshold is $100 — when accrued costs reach about $100, a charge is triggered; if only $30 accrued unpaid in the month, about $30 may be settled on the 1st of the next month. Thresholds are adjustable, and the actual charge can be slightly above the threshold, so a new account's first charge cannot be promised to be any fixed amount.
Temporary preauthorization and single-use virtual cards
| Scenario | What you'll see | How to read it |
|---|---|---|
| Adding a card | A Pending / authorization hold appears on the card | May be a temporary preauthorization; it does not mean ad fees have been paid |
| First formal payment | Google Ads shows Completed and provides a receipt link | Confirm the payment succeeded and its purpose, then check the card's settlement |
| Single-use card verification | The official $1 test may appear | Applies only to the corresponding single-use card flow, not to every card's first charge |
| Registration verification payment | The account explicitly asks you to pay a specified amount | May be a true prepayment for future ad costs — don't confuse it with an authorization |
Ordinary virtual cards and single-use cards need to be treated differently. Long-term virtual credit or debit cards can be set as the postpay primary card where applicable; once a single-use card expires or its usage count is exhausted, it cannot cover future automatic charges. The official single-use card guidance offers a one-time payment path, but it does not guarantee every card product and region accepts it.
The $1 guidance for single-use cards: the corresponding official flow requires reserving an extra $1 of available limit for verification — for example, if you want to pay $50, prepare at least $51 of available limit under that flow, and cover any fees the issuer may charge. This $1 is a verification arrangement within that flow; it can't be written up as "Google Ads charges $1 to open an account".
Some new accounts are also asked to make a verification payment, which can be used toward future ad costs. Follow the account's explicit prompts; don't interpret every small transaction as "money that will definitely be refunded later".

Start running ads and control your first spend
If you chose not to create a campaign when opening the account, create one after payment is complete; if you already submitted ads during signup, ads may start once the postpay billing is ready — pause campaigns for now if you don't want them running yet. Ad review, verification, and processing time all affect launch; a successful payment does not guarantee immediate display.
For your first ads, you can fill in these items on the page: define the business goal and the available ad types, then fill in the target page, service area, language, audience or keywords, copy, bid, and budget. Search ads are only one ad type; don't generalize its "pay per click" description to every ad type. Also check that conversion tracking records the behavior you actually care about.
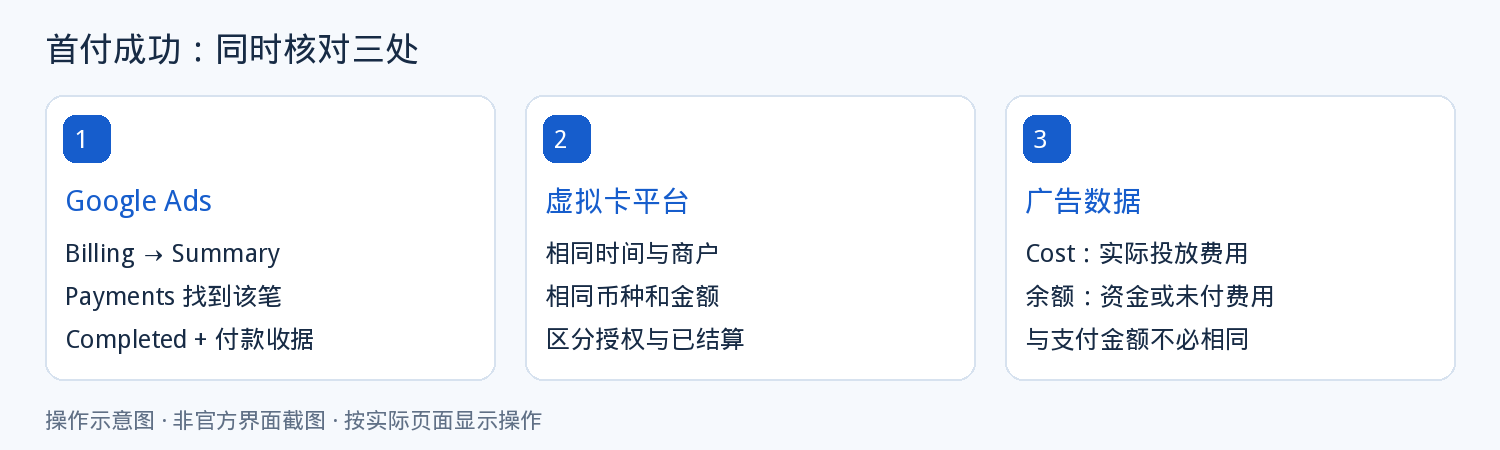
Verify your first payment and download the receipt
- In Billing → Summary, look at Payments, find the payment by date, and confirm the status is Completed.
- Click the receipt link for the completed payment and save or print it.
- On a postpay account, see whether the unpaid balance decreased or a credit formed; on a prepay account, see whether available funds updated.
- Records marked Pending, Failed, or Declined do not count as successful payments.
Invoices and receipts are not the same document. A payment receipt proves a specific payment; the type, generation time, and location of tax invoices or monthly statements vary by country and billing settings. Look for the applicable Documents / files entry under Billing and download monthly. Some regions don't auto-email documents, so don't just wait for your inbox.
Reconciliation example: manually paid $50, actual ad costs $8, and available credit about $42 — these differing numbers are a normal calculation relationship. With taxes, previous balances, or billing adjustments, check Net cost / Payments / Balance item by item instead of just comparing one campaign's Cost against the card charges.
| What to record | How to fill it in |
|---|---|
| Google Ads Customer ID / billed entity | View and record it in the account's billing settings |
| Payment date / currency / amount | Per the payment records in Billing → Summary |
| Virtual card last 4 digits / status | Verify alongside the primary card indicator |
| Payment model / receipt number | Prepay or postpay, and save the receipt link |
Payment failures, changing cards, and stopping charges
| Issue | Check first, then act |
|---|---|
| No card payment option | Billing country, currency, account eligibility, and currently available methods |
| Card failed to add | Card attributes, online payment permission, billing address, expiry date, and required verification |
| Card saved but never charged | Whether the postpay primary card is set correctly; whether the card is restricted |
| Payment stuck on Pending for a long time | Check the payment record and card status; don't keep submitting duplicate payments |
| Google asks for a 6-digit confirmation code | Check the matching transaction description and enter it per the account's verification task |
| First payment succeeded, later ones fail | Single-use card exhausted, balance, limits, and automatic charge permission |
| Charged again after pausing ads | Costs incurred before pausing, automatic settlement, other accounts, and backup cards |
When a transaction is declined: check the failed date, amount, and any available reason in Billing → Summary, and provide the transaction info to the issuer or virtual card provider to investigate. Until the reason is resolved, don't keep running small repeated tests or switching cards. If Google restricted a payment method, resolve eligibility or verification per official prompts instead of mistaking a platform restriction for a simple balance issue.
Changing cards: Billing → Settings → add a new payment method → complete verification → set it as primary on postpay accounts → verify the payment method for the next charge. A card number change usually requires adding a new payment method rather than just editing the old card's expiry date; handle the old card per the options your account allows.
Picking a card by campaign scenario: your limit is your budget ceiling
Card type selection guide
Compare card types by payment requirementsCompare card types across 5 user profiles and 15 use scenarios, and learn how BIN ranges work and how to combine multiple cards.Visa virtual card
Merchant accepts Visa, or you're unsure of their preferenceThe most widely accepted; works for both subscriptions and ad campaigns, and suits your first end-to-end payment.Mastercard virtual card
Card verification and monthly auto-renewalsMore consistently compatible with card verification and recurring automatic charges.US virtual credit card
For accounts based in the US that require a US billing addressA US BIN paired with a US billing address fixes declines caused by mismatched addresses.Hong Kong virtual credit card
For accounts based in Hong Kong that require an HK billing addressAn HK BIN paired with an HK billing address, used under the same principle.Giving your ad-spend card its own limit is equivalent to setting a budget ceiling for that line of business; changing the card incurs another card-opening fee ($1 and up, priced by BIN range).
FAQ
Can I pay for Google Ads with a virtual card?
It depends on the card's attributes. Automatic postpay requires an applicable credit or debit card — prepaid cards are not accepted; and not every virtual card supports advertising merchants. Before opening an account, confirm the card's attributes and merchant support with the issuer, then decide between the prepay and postpay paths.
Does opening an account cost $1?
Opening the account itself is free. When you add a single-use virtual card, the official flow may require reserving an extra $1 of available limit for verification — that is not the Google Ads account-opening fee, and it cannot be generalized to all card types.
Why does a small charge appear after I add a card?
The Pending or authorization hold you see when adding a card is usually a temporary preauthorization used to verify that the card is valid — it does not mean ad fees have been paid. Official documentation usually releases it within a week, and the exact amount is shown at signup.
Why was I charged again after a manual payment?
If a manual payment lands close to the automatic charge time, two payments can appear. Check the status and purpose of each one before deciding whether it's a duplicate; also check whether a backup payment method is set, since a backup method is charged when the primary card fails.
Will I need to verify again when I change cards?
A card number change usually requires adding a new payment method and completing the corresponding verification, not just editing the old card's expiry date. After adding it, set it as primary as needed and check which method will be used for the next payment.
Why am I still charged after pausing my ads?
Pausing only stops new impressions. Costs incurred before pausing, periodic automatic settlements, and other accounts or backup cards can still produce charges. To stop future spending, first pause all related campaigns, then review fees already incurred but unpaid.
Get your card ready before opening the account
The Google Ads signup flow is not complicated by itself — the bottleneck is usually the card in your hand: wrong attributes, wrong region, or a card that doesn't support advertising merchants and subsequent automatic charges. Prepare the card and its limit first, then follow the steps above.