
Step 1: Log in to Cursor and find the subscription entry
Open cursor.com (external source, for verification only, not an endorsement) — Cursor's official site — click Sign in, and use the original email or the login method the page offers. The Cursor editor on your computer must be signed in to the same account.
The subscription entry is at cursor.com/dashboard/billing (external source, for verification only, not an endorsement): with an existing plan, click Adjust plan on the current plan card; new users can also enter from Get Pro on the pricing page.
Path: cursor.com → Sign in → Dashboard → Billing → Adjust plan / Get Pro
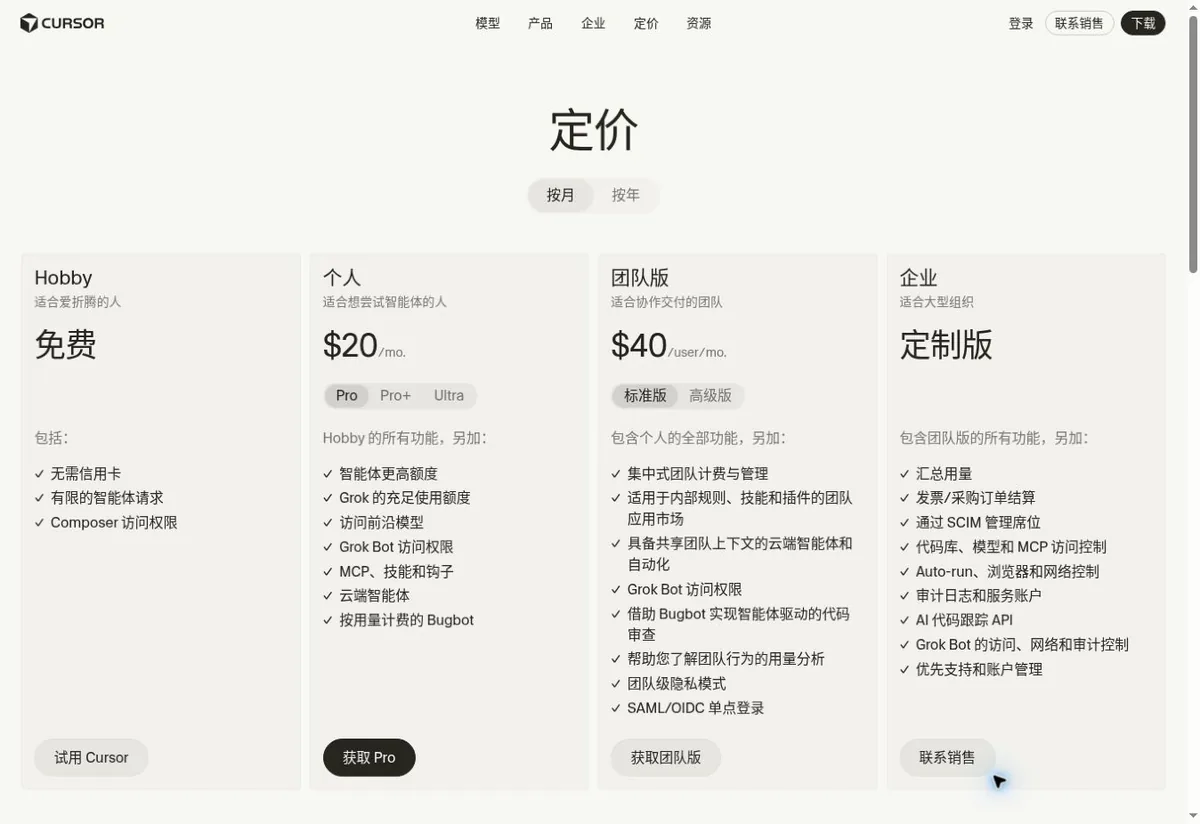 Illustrative walkthrough (not an official screenshot, no real information), fictional and shown only to understand the layout and price items. The prices and buttons in the image are for recognition only; actual purchases are subject to your account's checkout page.
Step 2: Choose a plan and billing cycle
This tutorial uses the personal Pro monthly plan as an example; the screenshot shows Pro at $20 per month, and the other personal prices in the table come from official help materials. Teams is a per-user team product, and you can't treat the per-seat price as the total for the whole team.
| Plan | Standard monthly | Annual or promo note | Use case |
|---|---|---|---|
| Hobby | Free | Not applicable | Try out the basic features first |
| Pro | $20 | As shown on the checkout page | Regular individual use |
| Pro+ | $60 | As shown on the checkout page | Higher individual usage |
| Ultra | $200 | As shown on the checkout page | High-usage individual workflows |
USD public standard prices or the promo prices in the screenshot; taxes, offsets from an existing plan and account promos are all settled on the final confirmation page.
After choosing Monthly or Yearly, confirm the actual total. The plan includes a certain amount of model usage; enabling On-demand (extra usage) can create charges beyond the plan fee, so set the allowance and the spending cap only as needed.
Step 3: Fill in payment details matching the PIKABAO card
In the Adjust plan or Get Pro flow, choose the personal plan and cycle to reach the official Stripe checkout page, then fill in the card and billing details. The payment form fields map one-to-one to the PIKABAO card face:
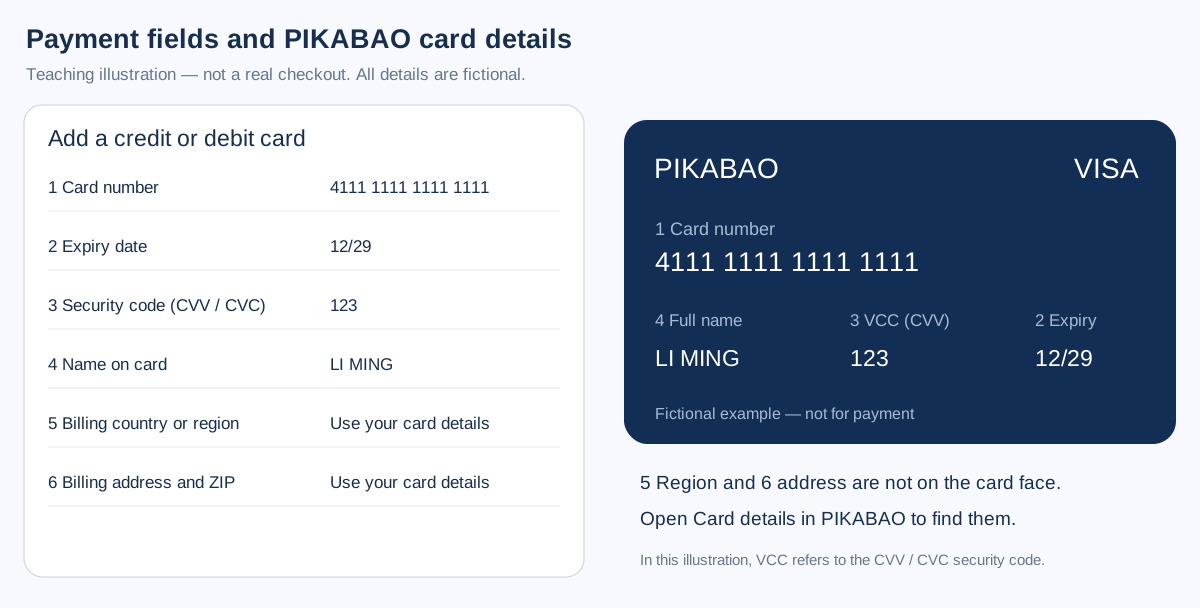 Illustrative walkthrough (not an official screenshot, no real information); all data is fictional and can't be copied for payment. The VCC label on the card face stands for the security code throughout this tutorial; standard payment fields usually call it CVV / CVC.
Cursor's checkout takes the card number, MM/YY, CVC and cardholder name, then the billing address. Pull the values from PIKABAO → Card details rather than from the Cursor invoice, which only shows the last four digits. Confirm the digits match before pressing the confirm button; see Where to find your card number, expiry and CVV.
Cursor checks the billing country against the card's country. Use the country, city, state and ZIP from PIKABAO → Card details as they are; an address borrowed from a tutorial produces a decline that looks like a card problem and is not. See Where does the billing address come from.
Choose a PIKABAO card that currently supports this merchant and subscription renewals. Whether the Stripe checkout goes through depends on the specific card, the bank and the merchant's review; no guarantee extends to every card family.
Step 4: Pay and confirm the subscription is active
Before clicking Subscribe, check three things: the total equals the $20 plan plus tax, the currency is USD, and the last four digits match the card you just entered. Stripe may trigger 3-D Secure; if the card has no 3DS channel the step is skipped, and a skip is not a failure — confirm in Billing.
3-D Secure can appear on the first Cursor payment and again after a long gap between charges. Finish it in whichever form the card supports, then wait for Cursor's own confirmation screen — the dashboard may need a refresh before Billing shows the new plan.
Return to Billing to view the current personal plan, then verify the same signed-in account in the editor and refresh it — the web subscription and the editor activation are linked through the same account.
Step 5: Confirm membership and save payment receipts
The Billing page is used to manage payment methods, invoices and cancellation; clicking Manage Subscription opens the Stripe billing portal to view payment history. Official instructions: Cursor Help · Pricing and billing (external source, for verification only, not an endorsement).
In PIKABAO, open the card and read the lines from CURSOR. A pending amount at the subscription price is an authorization; the plan is live when Cursor's Billing page shows Pro and the record settles. Cursor bills monthly from the date you subscribed, not from the first of the month.
Save the plan name, order or invoice number, amount actually paid, payment time, next renewal date and the official receipt. When sharing screenshots, cover the full card number, security code, address and personal information.
Stop auto-renewal
cursor.com/dashboard/billing (external source, for verification only, not an endorsement) → Manage Subscription → Cancel Subscription, then confirm. Officially, you can keep using it until the end of the current cycle after cancellation; the cancellation entry is at Cursor Help · Cancelling your subscription (external source, for verification only, not an endorsement).
Deleting your PIKABAO card, running out of balance, uninstalling the software or signing out of the account cannot replace formally cancelling the subscription on the platform. If you bought through an app store, manage renewals in the original purchase channel.
Payment failed or membership not showing: four triage categories
Details rejected: three card fields plus a separate CVC box, and the CVC is the three digits on the card. Rejections here are usually a mistyped digit or an expired card, so compare against PIKABAO field by field before trying a different card and adding a second failed attempt to the account.
Limit too low: Cursor charges the plan price at the start of the cycle, plus separate on-demand usage if you enabled it. The limit has to cover the plan plus whatever usage cap you set, otherwise the renewal fails on a card that handled the first payment without complaint.
Charged but the dashboard says Hobby: check that the editor and the website are signed in to the same account. The plan follows the account, and a second login created with a different method is the usual cause. Send Cursor support the invoice ID, not the card number.
Renewal amount changed: check taxes, ended promos, the annual cycle, extra usage, seats or credit purchases. Refunds must be requested per the merchant's policy; cancelling the subscription isn't an automatic refund. Don't mistake running out of model usage for an expired subscription — check Usage first; bills for extra usage and products such as Bugbot should also be checked separately.
Don't have a card yet? Open one first: what to prepare
| Step | What to prepare | Fee & time |
|---|---|---|
| Registration | Email + password, activation code | About 30 seconds, free |
| Identity verification | Submit genuine identity details under current first-issuance requirements; configure two-step verification separately | Subject to the actual review status and published terms |
| Two-step verification | Configure Google Authenticator as prompted to protect the account with time-based codes | Separate from identity verification; not a substitute for identity review |
| Top up your account | USDT, only the TRC20 / ERC20 chains | $0 fee; minimum 20 USDT per deposit |
| Open a card | Pick a BIN and initial limit (minimum limit of 20) | Card fee from $1 + 3% service fee on the limit |
To open a card with a limit of 30, the account is actually charged $31.90 (= 30 card limit + 30×3% service fee + $1 card fee), of which the fee genuinely taken is only $1.90 — the remaining 30 is still your spendable limit. The full breakdown of all four fees is at What is the total cost of using a card; the fee rates are on the site at Pricing.
Definitions and maintenance
The illustrations are walkthrough diagrams — not official screenshots, with no real information; no real card-binding interface from a personal account was obtained, no actual payment was made, and the diagrams aren't labeled as official screenshots. Reviewed on 2026-10-12. Plans, prices, buttons and eligibility may change; defer to the actual prompts on your own account's official pages.
Other subscription and deposit guides: ChatGPT Subscription Guide, Claude Subscription Guide, Facebook Ads Setup Guide, TikTok Ads Guide, Google Ads Guide, Binance P2P USDT purchases and PIKABAO deposits, OKX P2P USDT purchases and PIKABAO deposits, Coinbase USDT purchases and PIKABAO deposits, Runway subscription guide: payment and activation, Midjourney subscription guide: payment and activation, ElevenLabs subscription guide: payment and activation, Gemini subscription guide: Google AI Pro activation, Perplexity Pro subscription guide: payment and activation, GitHub Copilot subscription guide: payment and activation, Notion AI subscription guide: Business plan activation; the full index of answers grouped by topic is in FAQ, and choosing a card and fee rates are in All card types overview.
Frequently asked questions
How much is Cursor Pro per month? How is extra usage billed?
Personal Pro is $20 per month, and the plan includes a certain amount of model usage; after enabling On-demand (extra usage), the excess is billed by usage and creates charges beyond the plan fee. Keep it off when you don't need extra charges, and set a spending cap as needed.
Which checkout page does Cursor use?
The official Stripe checkout page: after choosing the plan and cycle in the Adjust plan or Get Pro flow, you enter it and fill in the card and billing details. Receipts and payment history are also viewed in the Stripe billing portal.
My web subscription succeeded, but the editor still shows the Free version?
First confirm that the editor is signed in to the same account and refresh it. The web subscription and the editor activation are linked through the same account; being signed in to different accounts at the two entries is the most common cause of "paid but not activated".
Does Cursor require an address when binding the card? What if the card face doesn't show one?
Yes. The billing country or region and the address aren't shown on the card face; open "Card details" in the PIKABAO dashboard, and fill them in split across the Stripe checkout fields; don't make up an address. A mismatch can be blocked by the AVS check.
Cursor charged me but Pro isn't active — what should I check first?
First verify the signed-in account and the order status, then check the Stripe payment history and final activation. A temporary authorization on the card doesn't mean the subscription is active — confirm the two separately; if the charge succeeded but nothing was activated, contact official support.
Can I multiply Cursor's per-seat Teams price into a team total?
No. Teams is a per-user team product, and the total changes with the number of seats; for individual use, don't go into the Teams entry by mistake, and don't treat the single-seat price as a fixed total for the whole team.
My model usage ran out — is my subscription expired?
No. First check Usage in the editor to confirm your usage and the refresh cycle; plan usage usually resets per cycle. Only when you need more usage should you consider enabling extra usage or upgrading the plan.
Is subscribing to Cursor with a virtual card reliable?
On a card family that supports this merchant it's a standard scenario: when the BIN's issuing country, the merchant category and the billing address all line up, the Stripe checkout basically goes through. Insufficient limit on the card on renewal day causes renewal failure — remember to leave room for the tax-inclusive amount.
The amount was higher on renewal day — is the platform overcharging?
Check taxes, ended promos, the annual cycle and extra-usage bills (including products such as Bugbot) first. The difference isn't a fee collected by the platform; it's tax added to the bill on the merchant side or a usage charge.
Open a card and get your Cursor Pro subscription started
Opening a card costs from $1 with no monthly fee; top-ups accept USDT only. Cursor Pro needs about $25 of card balance to clear the $20 plan plus tax and rate movement.